The same methods described below can also be used to clean other hard durable minerals like beryl, spinel, chrysoberyl etc.Probably the most commonly requested information about cleaning mineral specimens is for information about how to clean quartz crystals. Quartz crystals are pretty tough customers and you can clean them pretty aggressively, both by mechanical and chemical means. By that I mean you can go after most of them with a stiff brush ..
View full Click
The same methods described below can also be used to clean other hard durable minerals like beryl, spinel, chrysoberyl etc.
Probably the most commonly requested information about cleaning mineral specimens is for information about how to clean quartz crystals. Quartz crystals are pretty tough customers and you can clean them pretty aggressively, both by mechanical and chemical means. By that I mean you can go after most of them with a stiff brush and scouring powder if you want or put them in most strong acids (not hydrofluoric acid) without hurting them. You can even use steel or aluminum bristle brushes if you want, but since quartz is harder than these metals. You may have some of the metal rub off on the quartz crystals, which you will then have to clean off the quartz, but it should not hurt the quartz.
Are there any exceptions to this? Yes, if the quartz crystals are loosely jointed together, like a cluster of slightly intergrown Herkimer quartz crystals from New York, rough cleaning may cause the crystals to separate from each other where they grow together. If the quartz crystals are intergrown, thin and prismatic like the specimens from the Jeffrey Quarry, Jeffrey, Pulaski Co., Arkansas, USA or the specimens of spiky quartz specimens from Huaron, Peru, rough treatment may cause some to break off. If the quartz is of the “water quartz” –fenster-jacaree variety, and contain fluid inclusions and bubbles, if you subject them to freezing temperatures or toss them in hot water, the crystals my crack. Quartz crystals from some localities do seem to be sensitive to thermal shock. The "herkimer diamonds" from some of the localities near Herkimer, New York appear to be some of these. When first collected, collectors have learned to quickly wrap them up, mud and all and put them in an ice chest the let them get used to life outside of the pocket they formed in. Then in a day or so they are carefully cleaned with water that is the same temperature as the quartz. Not doing this risks shattering some of the beautiful clear crystals. Crystals from some of the Herkimer localities seem to be more sensitive to thermal shock than others. These are the exceptions. Most quartz crystals are tolerant of temperature change, but this is something to think about when you are cleaning your quartz crystals. If you clean a lot of quartz from a particular locality you will quickly learn what they can tolerate and what they can not. Of course if you bang your quartz crystals together, they will chip each other. Finally, quartz specimens with associated minerals may limit your aggressive cleaning options because of the possible delicate nature of the associated minerals and undesirable interactions with various chemical reagents. Other than these exceptions, you should feel free to have at them.
Keep in mind that in most instances the “dirt” you want to clean off of your quartz crystals are minerals also, and that when you “clean” the specimen you are actually removing minerals from the specimen that nature put there. Some collectors and mineralogists feel strongly that by removing this “dirt” you are destroying data that would better be preserved for future generations. Historically, this is not done very often because the lure of a possibly more beautiful and valuable mineral specimens is irresistible. Some times you can mostly clean your specimens and leave some of the natural “dirt” on a part of the specimen that will not detract from its “curb appeal”. Also, fortunately quartz is one of the most abundant minerals on the earth, and for every one you “destroy” cleaning, there are plenty more left to study.
For several years I and some associates ran a little mine in Minas Gerais state in Brazil in the hills just outside of the little town of Joacuam Felicio. It was in the vast sandstone region of Minas Gerais and not the granite/pegmatite region of the state. It produced mostly little single quartz crystals, and many of them had beautiful phantoms inside the crystals, but most of them were not very shiny and had a fair amount of damage. We found that the way to market them successfully was to have the surfaces ground down by flat lapping them and having them polished by standard lapidary procedures. They sold well. I had a number of collectors ask me to bring in some of the natural unpolished crystals, which I did, but even when I priced them less than polished crystals of comparable quality, they would not pay the price. Finally, I just told the guys to polish them all though I did save a few in their natural state. So I guess the lesion I learned is that in reality very few people are concerned with preserving the natural “dirt” on quartz crystals. But for the sake of future generations you should make sure any specimens you collect are labeled with the mine name, state/province and country and it can't hurt to preserve a few in their natural state.
Most of the time a person wanting to clean quartz crystals is trying to remove a white coating or brown “iron stains” from the crystals. Quartz crystals from pegmatitic environments are frequently coated with mica, feldspars and various mostly white clay minerals. Quartz from sedimentary environments like those from the sandstones of Arkansas, USA or those in the sandstone areas around Diamantina, Minas Gerais Brazil are often “iron stained”. In these examples and many more, the quartz is covered or stained with other minerals that detract from the nice shiny sparkling surface of the crystals. To those of us with a practical bent, we hope that lurking just below the offending crud are beautiful shiny quartz crystals. In most cases you don’t have to know exactly what it is you need to remove although that is desirable information to know if you can discover it. Often these fine grained “iron stains” or white coatings are not easy to characterize mineralogically, and it is not worth the effort.
Sometimes which cleaning method you choose will depend on the tools and chemicals you have to work with. I am a large wholesaler of minerals and over the years have tried most of the various cleaning methods and have most types of cleaning equipment available to me. We will consider first cleaning with mechanical methods before we move on to chemicals.
1. Mechanical Cleaning
A lot of how you clean your quartz specimens will also depend on how much of it you have to clean. If you are running a quartz mine in Arkansas or digging amethyst from the decomposed basaltic soil near Artigas, Uruguay, you will likely have pick up trucks full of very dirty muddy specimens to deal with. The best way to clean the mud off is to place the specimens on rectangular screens nailed to 2x4 frames. Even placing them on the ground will do. Blast them with water from a hose or a pressure washer with as much force as you can, being careful not to use so much force that you blast the specimens into each other or cause them to roll over on the cement or the black top. If you can afford an electrically or gas driven pressure washer so much the better. Then let the specimens dry out. This will cause the remaining mud to crack and shrink and then repeat the process till it is clear that more cleaning by this method will not improve them very much.
So after you have removed as much of the gross dirt/mud as you can from the specimen examine the specimen closely and scratch at any remaining "dirt" with a knife blade. See if you can dislodge the offending material by scraping at it. Use the point of the blade if you have to. Don’t worry about hurting the quartz crystal, it is harder than the steel of the blade by a good deal. Worry more about the blade slipping and cutting you hand. Ideally you will want to do this under a binocular, reflected light microscope so you can see exactly what is happening and if you are really making any a dent in the offending coating. Don’t be afraid to really go after it. If your don’t have a microscope, use a magnifying glass. If you can scrape the surface clean at all, even if it is only in a tiny area, there is a good chance that you will be able to clean the quartz mechanically. If you can’t scrape the surface clean, then there is a good chance that the surface of the quartz has been naturally etched or the offending material is intergrown in the surface of the crystal or is growing just beneath the surface. This is what you are trying to observe under magnification. If the material you would like to remove is intergrown in the surface or growing just below the surface you are sunk and there is not much you can do to improve the specimen short of grinding away the surface and polishing it using normal lapidary producers. These lapidary procedures are labor intensive and you can’t just “buff up” the crystals and make them shine like you can do with brass or copper. I know of no chemicals method that make a dull quartz crystal shiny. Well, wait! I should not say that. I have seen formerly quite unattractive quartz crystals that have been put in the big, heated stainless steel autoclaves full of concentrated (sodium hydroxide solution-lye) that are used to grow synthetic quartz and afterwards new quartz has been grown on top of these crystals and they look quite nice. But, that is the only exception I know about. If you can't make a dent in what it is you want to remove there may yet still be a tiny shard of hope left, but Ill talk about that below. This will be for the real diehards who know something about chemicals and how to use them safely.
2. Soap and Water Use liquid detergent soap, not the kind that comes in a bar. This is always a good first step. This will remove any easily removable dirt and can can often give you an indication on how you should proceed with the cleaning. If your detergent is the kind that has perfume or lemon sent added, your specimens will have the added virtue of smelling nice. Sometimes, experienced cleaners will skip this step and proceed to blasting their specimens with high pressure water to see if that will remove the offending substance. The easiest way to do that is to buy one of the little handheld spot cleaning guns called fabric guns. They are commonly used in the dry-cleaning industry for removing spots from fabric. You can buy these for less than $75 dollars. If you Google "spot cleaning gun" you will find a lot of these offered for sale. These little “buzzer guns” used to cost several hundred dollars and still many dealers bought them, because they cleaned specimens so wonderfully and made the dealers so much money. Often dealers could pick up old specimens that old dealers had tried to clean but were never able to clean completely because the dirt was down in cracks that they were unable to reach with a tooth brush or other tools available. Five minuites or less working on them with one of these new little buzzer guns would sometimes enable these newly cleaned old specimens to be sold for hundreds of dollars more than they would have been sold for in their partially cleaned state. The appearance and availability of these little cleaning "guns" for the cleaning of specimens is tremendous. Its impact on cleaning minerals is like the difference between copying a book by hand using a quill and ink verses using a modern laser printer.
These little "guns" have a little short barrel and just below is a bulb like reservoir that the user periodically unscrews and fills with water (hot and soapy is you wish). When you pull the trigger on these handy little devices a little spring driven piston hammers rapidly back and fourth and forces small powerful jets of water out of the nozzle of the gun. It looks continuous but in reality it is intermittent. If you put your finger directly in front of he nozzle, the stream is often powerful enough to drive water under your skin, but the force of the stream quickly diminishes with distance from the barrel because of turbulence. A yard or so from the nozzle, the stream turns into a mist. You can quickly get a feel for just how much force you are applying to the specimen by holding your hand as far away as you can and then bringing your hand closer. Pretty soon you will feel the water stream against your hand and when you come close enough, it will start to sting. It is a good idea to stop at that point. By doing this little exercise you can quickly tell how far away from the specimen you will need to hold the gun to apply the amount force you want. You will commonly hold the "gun" in one hand and the specimen in the other. With quartz, you can usually blast away to your hearts content. You need to be a little careful because if delicate crystals are loosely attached to your specimen, you can blow them right off the specimen. You will find however, that often crystals are tougher than you might think. Once you gain a little experience you will find you can scratch at your quartz with the point of a knife and know if it can likely be cleaned with high-pressure water. Sometimes the high-pressure water will only partially clean the specimen and to finish it you may need to switch to a somewhat more aggressive mechanical cleaning method, namely that using an air abrasive tool. Usually however, if we judge that the coating is really tough to scrape off we will skip the high-pressure water and go directly to one of our air abrasive units.
3. Air Abrasive Tool Cleaning and Air Scribes.
If blasting your quartz crystals with high pressure will not remove the offending material, there is yet another mechanical means of cleaning them that will almost certainly work providing of course that you could scrape away a bit of the offending material with a knife blade as described above. This is by using an air abrasive tool. Sometimes people call these sand blasters. These operate by directing a stream of high-pressure air against the specimen that carries an abrasive media along with the air. The abrasive material acts like a scouring powder to remove or abrade away what it is directed against. The trick is that you need to use an abrasive media that is less hard than the material you are trying to clean so you won’t abrade away/damage what you wish to clean. With quartz you will want to use tiny glass beads rather than quartz or garnet sand. The glass beads will not visually tear up the surface of the quartz. Quartz or garnet sand will usually remove the shiny surface of quartz crystals and leave them dull. If you do not have access to an air abrasive tool, see if one of your local garages or metal working establishments has one that they use to clean spark plugs or deburr metal parts and see if you can borrow some time on it. But make sure that you don’t use anything more aggressive or harder than glass beads. Don’t use crushed glass. The sharp edges of the crushed glass will usually remove the luster from shiny quartz crystals. Start out with about 60 pounds of air pressure and then more if necessary. Often you can clean up small specimens of quartz (hand size) in a few minutes with this kind of equipment. Air abrasive tools are commonly used with different kinds of abrasive powders to clean and prepare fossils. We have used large and small versions of this equipment for years and they have paid for themselves many times over.
If you don’t have access to this kind of equipment, you can do it the old fashion way and just keep scraping away with hand tools. Used dental picks make wonderful tools for this type of work and little hand electrical grinders like flexible shaft tools can be handy. But no matter how much time you spend cleaning your quartz by hand, the results will rarely be as good as you can obtain with air abrasive equipment and it will take you ten to a hundred times longer.
Another modern tool that is often handy when “cleaning” quartz specimens is an air scribe. This is a little miniature hand held jackhammer powered by compressed air. They look a little bit like fat pencils and you can use to help shape your specimen or to remove chunks of offending material that may be growing on your quartz crystals. If you take enough time with the air abrasive tool, you can often remove large thick masses of material, but often an air scribe will remove it in seconds rather than minutes or hours. We have some made by Chicago Pneumatic.
Chemical Cleaning
Perhaps the most common reason people want to clean quartz is to remove brown “iron stains”. These “iron stains” are mostly caused by two iron oxide minerals, hematite and goethite. They are usually a rusty brown color but can manifest a range of colors from black to red and the term limonite is often used to name them collectively. There are a fair number of other minerals that lie in that color range that may require other chemical treatments than those discussed below. A lot of this offending material can be removed by mechanical means, often easily with high-pressure water or by use of an air abrasive tool. But if the collector does not have access to these devices he often hopes for some magic liquid that he can dip his specimen into that will remove the offending material. I think that the success of some commercial cleaners like Tarnex (a silver cleaning solution) where the user dips tarnished silver into the solution and magically the silver becomes bright, is the root cause of this desire. For cleaning quartz, no such magic solution exists.
If you have “iron stained” quartz crystals, blasting them with high-pressure water and or an air abrasive tool will remove a lot of the iron staining, but almost certainly some of the staining will remain down in the cracks. To completely or almost completely remove it, you will need to use chemicals. Before you use chemicals I would suggest you clean the specimen as well as you can with the above methods. This will allow you to more quickly chemically clean your specimens and use a smaller amount of chemicals to do it. There are three main ways to chemically clean “iron stains” off of quartz and they are by the use of, 1. A Waller solution (Iron Out), 2. Oxalic acid, or 3. Hydrochloric acid. These three chemical methods have through experience been shown to remove “iron stains”; (hematite & goethite). I should state that at this point that it is almost impossible to remove well developed crystals of hematite and goethite with the chemicals discussed below and they are effective in removing only the fine grained equivalents of these minerals.
These three chemical reagents are helpful in removing hematite (iron oxide) and goethite (iron hydroxide) specifically, so if your “iron stains” are caused by other minerals, these three chemical methods may or may not work for you. If you know exactly what offending minerals are on your quartz specimens and have some knowledge of chemistry, then the choice of chemical cleaning agents is much more clear-cut. Ideally a person wanting to clean some quartz specimens would analyze the offending “dirt” and find out exactly which mineral(s) comprise the “dirt” and would then pick the appropriate chemical cleaning method. In practice it is usually easier to fool around with easily available chemicals than go to the trouble of doing the required analysis that is often not simple or straightforward especially when dealing with fine-grained mixtures of various minerals. So, since the nature of what you want to remove may be in doubt, the best advice I can give you is to try the chemical reagent on a not very valuable specimen and see if the reagent you choose will accomplish what you want. Don’t start with your best specimen and hope for the best.
4. Waller Solution (Iron Out)
Cleaning quartz crystals with Waller solution (a solution of sodium dithionate)
If you decide to try and use chemicals to clean your quartz because you want to remove some “iron staining” I would definitely recommend that you first try using a Waller solution because the chemicals in this solution are not difficult to obtain, at least in the United States and generally less harmful than oxalic or hydrochloric acid. To read about the use of this reagent and how to make your own Waller solution, check out this link:http://homepage.mac.com/rasprague/PegShop/extras/waller/waller1.html. [Link Broken? May 2012] The Waller solution is a buffered solution of sodium dithionate. Easier than buying the chemicals and mixing them yourself, you can buy a product from Wal-Mart called Super Iron Out. You buy it in plastic bottles. It is a fine white powder and you mix it in water according to the directions on the bottle. If you don’t have a Wal-Mart near you, have someone who does buy and send you some. You can also Google the name, Iron Out, or use http://www.summitbrands.com/summit/ and buy some through the mail. Maggie Wilson, one or our regular Mindaters informs us that in the United Kingdom, that Iron Out is know as Rust Out and is distributed by Aqua Cure, Telephone: 01704 516916 Website: www.aquacure.co.uk. Address: Aqua Dosa, Southport, England PR90SE
Sometimes these "iron stains" have worked their way deeply into cracks in quartz, and you may have to soak your specimen for days or weeks in the solution to get them out. There may be the rare case where you may never be able to get it all out. Solutions of sodium dithionate are not very stable because it reacts with atmospheric oxigen and you should not expect them to be useful after a few days. We have switched over to this method of removing iron stains almost exclusively from other chemical methods because it is quick and easy and we do not have to neutralize it when done and the disposal methods are minimal.
Franklin Roberts, from Austin Texas, an knowledgeable Mindat regular provides us with the following useful information for people who wish to make their own Iron Out solution. This may prove especially useful for those who live in countries where it is not possible to buy commercially available Iron Out/Super Iron Out.
33g sodium dithionite also known as sodium hydrosulfite
28 g NaHCO3
59 g sodium citrate
Add about 800 cubic centimeters/milliliters of water, swirl it around till the chemicals dissolve and and add enough water to make up a liter in volume.
If you would rather make a gallon of the solution, just multiply everything by four. It works slowly at room temperature and faster if heated, but don´t go beyond 60 °C. The other compounds beside the dithionite are for buffering/complexing reasons and will prevent precipitation of pyrite for instance which give dark greenish blackish coatings.
The MSDS (Material Safety Data Sheet) lists the active ingredients of Super Iron Out as containing:
Sodium Metabisulfite 20-65%
Sodium Hydrosulfite 20-65%
In this case, the prefix "meta" which is Greek for "after" refers to the fact that the metabisulfite is the species that comes after sodium bisulfite (dithionite) in the chain of oxidation products going from sodium dithionite -> sodium metabisulfite -> sodium dithionate. These three compounds are also known as sodium hydrosulfite, sodium pyrosulfite and sodium bisulfate, respectively. Pretty confusing, isn't it? The reason that super iron-out lists a wide range of percentages for the two ingredients isn't because they don't want you to know how much of each is in their product, it's because they don't know themselves. The actual ratio is a moving target. Remember, pure sodium dithionite is a potent reducing agent capable of snatching two atoms of oxygen from anywhere it can get it, from the air and even from water in the air. As soon as it snatches the first oxygen, it becomes sodium metabisulfite and can only grab one more before becoming the fully-oxidized sodium dithionate, which is useless as an iron reducing agent, but great for lowering the pH in your swimming pool. Products such as super iron-out usually are made from industrial grade chemicals that contain a lot more impurities than the reagent or high-purity grades. This bulk grade is sometimes called "product of commerce". The reason for using this feedstock is that the industrial grade chemicals sell for a few dollars a ton, while the pure stuff can cost a few dollars a pound. If all you want to do is remove iron stains from your driveway (or your minerals) industrial grade will work just fine. The feedstock used to make super iron-out probably started out as a moderately pure sodium dithionite (hydrosulfite), but during manufacture and storage, it gradually absorbed oxygen from the air and some of it oxidized, becoming sodium metabisulfite (pyrosulfite). Since the pyrosulfite is still a great reducing agent, it's ok to leave it in the mix, but it's nearly impossible to get an accurate estimate on its proportion. As time goes by, more of the dithionate will transform into the metabisulfite and then to the dithionate. Eventually, the entire batch will become sodium dithionate and it's days as a stain remover are over. That's why it's so important to keep the container sealed against the air after you open it.
5. Oxalic Acid
The use of oxalic acid in cleaning quartz crystals.
What ever you do, I would advise you using Iron Out as described above before you use oxalic acid. Oxalic acid is a poisonous white crystalline white powder that is dissolved in water and has the ability to dissolve various fine grained iron minerals and clean your brown “rust covered” quartz. Oxalic acid is the toxic substance that makes rhubarb leaves poisonous to eat. For many years it was sold in hardware stores for various purposes, perhaps the most common of which was to bleach wood. When you work with this chemical you should wear plastic gloves and make sure not to inhale its dust or get any in your mouth. Don’t leave solutions of this material lying around because they are poisonous. Before you start, go to Wikipedia on the net and read what it has to say about oxalic acid. Be sure to use technical grade or industrial grade oxalic acid because it is much cheaper than other more pure grades of chemicals and will work just fine for cleaning your crystals. It is best that this chemical is used in plastic or ceramic containers and not metal ones, because the oxalic acid will attack most metals. It will give you a good idea what you are faced with. A pound to a pound and a half in a five gallon bucket of water will make a good solution for cleaning quartz. The oxalic acid will take a few minutes to dissolve and you must keep stirring it till it dissolves. If you use hot water to it will dissolve faster. Oxalic acid was used for many years to clean quartz in Arkansas, and is still the chemical of choice of the large producers of Arkansas quartz crystals to clean the "iron stains" off their specimens. They use big metal tanks made from T1 steel that they heat with gas burners, almost to boiling and can clean large quantities of quartz crystals over night though sometimes they need to give some specimens a repeat treatment for best results. They buy their oxalic acid (mostly of Chinese manufacture) in big bags by the pallet full, and this has proved to be the most economical way they have found to clean their specimens. Most other dealers who need to remove iron stains from specimens have switched over to high-pressure water and Iron Out. When you are done you will not want to throw the oxalic acid solution down the drain. You can react any remaining oxalic acid in solution with limestone chips, which will produce a white relatively insoluble precipitate of calcium oxalate, one of the components of many kidney stones. Most people who use this chemical just keep the used solution around to use again when needed and occasionally add more oxalic acid as needed. Some let it evaporate to dryness. I have used oxalic acid on many occasions to clean “iron stains” from quartz crystals and crystals of the blue variety of microcline called amazonite. If you want you can heat it up and this will cause your specimens to be cleaned faster. I have done this in crock pots and stole the first one from my kitchen! An alternative to applying electric or fired heat you can put the oxalic acid solution in black containers or cover the containers in black plastic and let the sun heat the solution for you during the day. A chemist’s rule of thumb for chemical reactions is that for every 10 degree centigrade increase in temperature, the reaction rate of chemicals will double. When your specimens are clean, you should rinse them off and let them soak in clean water for a few hours. You may want to repeat this rinse process several times. Soaking overnight is good. Sometimes if your quartz specimens have calcium or iron bearing minerals on them, or the water you are using has a lot of calcium or iron in it. With these conditions using oxalic acid to clean them may cause calcium or iron oxalate to precipitate out of solution and coat your specimens with more crud you will have to clean off with hydrochloric acid.
6. Hydrochloric Acid
Hydrochloric acid, or muriatic acid or “pool acid” is hydrogen chloride gas HCl that has been dissolved in water. It is sometimes been used to clean quartz, but the methods above are better, safer and less trouble than using this acid. But if you don’t have them, you can use hydrochloric acid. Before you try and use this acid, go to Wikipedia on the net and read what it has to say about this acid. http://en.wikipedia.org/wiki/Hydrochloric_Acid. [Link Broken? May 2012] You can buy this acid in hardware stores and in places like the home depot. When you handle hydrochloric acid you should use rubber gloves and eye protection and should NOT use it in a confined area like your home or garage. There should be plenty of ventilation. Don’t work with this acid in your house or garage. You should also have a hose handy that you can use to flood any accidentally spilled acid with lots of water. Hydrochloric acid is a strong acid and must be treated with respect. The concentrated hydrochloric that you get at the hardware stores is rated at about 32% and gives off a strong acidic vapor. Do NOT stick you nose into the mouth of the bottle and try and smell this. You will smell enough of it just pouring the concentrated acid out of the bottle. Holding your breath is often a good idea. Use a plastic or ceramic container to clean your quartz. Plastic is much better because it is not as breakable. Make sure you have a tight fitting cover for your container. Do not use metal containers when working with this acid. Put your quartz crystals in the container and pour in hydrochloric acid to cover them. Because of the fumes this acid gives off, make sure you cover your container. Periodically examine your quartz crystals to see if they need to remain in the acid longer. It is not advisable to heat this solution because of the fumes this will cause. BE SURE NOT TO USE YOUR BARE HANDS AND USE EYE PROTECTION. When it looks like your quartz crystals are clean, rinse them off with water, and then put them in another container of clean water and let them soak for an hour or two. Soaking them overnight will not hurt them. You do this to remove any acid that may have been trapped in the cracks of the specimen. If the specimen has many cracks and a porous matrix you may have to leave the specimen in the rinse water for several days, and have to soak it several times in clean water to make sure that all the acid has been removed from the specimen. If you do not completely remove the acid from your specimen, it may turn yellow in places at a later date and you will have to repeat the acid treatment and the neutralization to get it clean. When you are done you can store the solution for future use or neutralize it. You will not want to store hydrochloric acid or solutions of hydrochloric acid long term in your garage or anywhere near metal. Plastic bottles of hydrochloric acid have a habit of eventually cracking and leaking. The solutions tend to give off hydrogen chloride and this is hard to contain and it will rust up every bit of iron anywhere near the stuff. I would recommend not storing it more than a week or two if you can help it. You can use limestone or marble chips to neutralize the acid. When you put limestone or marble chips (calcite) in the acid, it will bubble and froth while carbon dioxide gas is liberated. When you add more limestone and no more bubbling happens, then the solution is neutralized and you can dispose of it. Dilute hydrochloric acid is what your stomach uses to digest food. If you spill some acid on the floor or your cloths, just flush the area or your clothing with lots of water and just to be sure that the acid is gone you can pat down the area with bicarbonate of soda. If no fizzing takes place or the fizzing stops, then you have successfully neutralized the acid.
Phosphoric Acid
You can also use phosphoric acid to clean out iron stains, but usually the cost of the acid is more and it takes a bit longer. I don’t recommend you use this method. Sometimes using this method will cause phosphate minerals to precipitate on your specimens, and those are sometimes very difficult to remove.
Cleaning amethyst specimens from Thunder Bay, Canada.
Chemicals can be used to remove thin films of iron oxide minerals but sometimes when the iron oxide minerals are more than find grained, the use of chemicals quickly becomes not very effective. Some specimens of amethyst from Thunder Bay are coated heavily with iron minerals that can be removed with chemicals, but it is not easy to do so and the removal of these by chemicals means is a time consuming task. The reagent mixtures can include both hydrochloric acid and oxalic acid and heat. The formulas for the reagents used is somewhat proprietary and often arrived at only after considerable experimentation and confer an economic advantage on the users that they usually don’t want to give up. If someone would care to share detailed information about cleaning these kinds of quartz specimens we would be delighted to relate them here.
7. Cleaning Quartz with commercially prepared reagents containing small amounts of bifluoride.
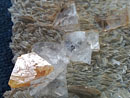
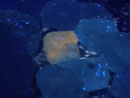
Here is a quartz cleaning technique that was suggested and documented by Mindat member Nik Nikiforou that appears to be so practical and good we are presenting it here for all Mindat members. If you are familiar with the way specimens look, especially quartz crystals look when they are freshly collected from a pegmatite pocket you will want to at least know this method of cleaning them, especially if you don't have any air abrasive tools at your disposal. Even if you do, you may want to give this method a try. Look at this before and after image of this Quartz and Spodumene var. kunzite specimen. Although the before picture is not very sharp and not taken of the specimen in exactly the same position as the after shot, it is plain to see that the cleaning of the specimen was very effective.
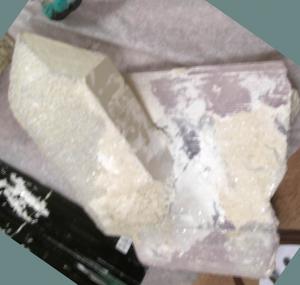 Kunzite & Quartz, Konar (Kunar; Konarh; Konarha; Nuristan) Province, Afghanistan----BEFORE
 Kunzite & Quartz, Konar (Kunar; Konarh; Konarha; Nuristan) Province, Afghanistan----AFTER
Although you can probably prepare a similar reagent using ammonium hydrogen fluorite (ammonium bifluoride a white poisonous powder)we would recommend you use a commercially prepared reagent called Whink. This is one that should easily be obtainable here in the United States. There are probably others. Perhaps someone will come forward with a formula and reagent preparation procedure for a similar reagent, but till then, this one will do well. For those of you in foreign countries who may not have access to this particular brand of bifluoride reagent I would advise you to ask or pay an industrial chemist to whip up a formula for one that you can use and perhaps even sell to others that may want to clean their quartz specimens. But for now, lets listen to what Nik Nikiforou says:
I've had good results removing the silicate "white stuff" from Quartz and other minerals using an easily obtained product called Whink Rust Stain Remover. It is a liquid and comes in a brown plastic bottle in 6,10,16 & 32 oz sizes and can be bought in many hardware stores and or on line. Before I go any further you need to know that this product contains 2% to 3% hydrofluoric acid, one of, if not THE most corrosive acids known, and extreme safety precautions need to be taken, including working with it ONLY OUTDOORS, wearing SAFETY GOGGLES and chemical resistant GLOVES. You must NOT let the liquid touch your skin and you must not breath the fumes. I can't stress that enough.
Having said that, I use it by putting the specimen to be cleaned in a LOOSELY covered plastic container (not glass as it will eat through glass!), pouring enough of the liquid in to cover the specimen, and keeping it out in the sun for several days or longer. If I need to process a large piece I will dilute it with enough water to cover the specimen, although this will prolong the amount of time needed for it to work. I will check it every couple of days by gently scraping at the white stuff to see if it has begun to soften. At that point I will remove it from the Whink and soak it in water for a few days, changing the water daily, in order to remove any remaining HF, especially if the piece is at all porous. I then gently scrape off as much of the stuff as I can with a dental tool or knife, and if the piece can physically stand up to it, hit it with the water gun. I often have to REPEAT this process two or three times (Whink treatment, water soak, mechanical removal) to get the last of the white stuff off. A lot of work, so it only pays to do this with better pieces.
CAVEATS:
1. This is not the cheapest way to use HF - you can get more bang for your buck by using HF obtained from chemical supply houses, which is much more concentrated and can be diluted to your needs. This is NOT an option for me or for most collectors - I have seen photos of the severe tissue damage caused by even short exposures to this acid and don't want it anywhere near me.
2. Whink can DULL the shine on Quartz and other silicates if used for a prolonged amount of time. It will also destroy some other minerals (don't use it on Apatite!), and it will slowly begin to etch Feldspars and Micas. Do some research or test on lesser pieces first.
3. Getting the white stuff off often does NOT improve the appearance of the specimen. In my experience, most crystal faces that are under the white stuff tend to be dull anyway; this is one of the reasons that the white stuff is so tenaciously attached to the crystal as it has lots of microsurfaces to "get a grip" on. From the photo of your piece this may be the case, as it doesn't look to have much luster on the exposed surfaces.
4. I've had a couple of cases where the specimen either lost some crystals or came apart because the "white stuff" was actually holding it together. You need to closely examine your specimen to gauge if this may happen.
Well, I've attached a before and after photo of a Quartz/Kunzite piece that I recently cleaned using Whink. It took about three weeks, using three complete cycles, to get the piece to where I was satisfied that I had done enough. Note that even though most of the white stuff came off the Quartz crystal, it was still extremely "luster challenged" after cleaning. Nonetheless I am quite pleased with the results (although I have also messed up a few pieces as well).
If you plan on using Whink PLEASE TAKE THE PROPER SAFETY PRECAUTIONS!
[Nik Nikiforou 2009]
In Brazil, the dealers who frequently buy and sell quartz crystals use a commercial cleaning liquid called Chispas which derives its cleaning effect from ammonium bi fluoride and other ingredients. It is used to clean iron stains from the quartz crystals and they credit it with also making the quartz brighter and this may be the result of the weak HF solution removing very micorcrystalline quartz from the surface of the quartz crystals. But I am not sure about this. I have seen it used in Rio Grande do Sul among the producers of amethyst specimens to make amethyst crystals bright and clean, and have been told that if the amethyst is left too long in Chispas, especially fresh Chispas, it will dull the amethyst crystals. I have seen specimens of amethyst where the amethyst crystals are still bright and shiny, but the underlying agate has been turned white on the outside and was told this was the result of even a short cleaning in Chispas. There are a number of commercial cleaning products that use bifluoride in their make up; among these are those used in a regular basis in commercial car washes. Solutions of ammonium bifluoride should be neutralized by dumping marble or limestone chips into the solution. This will cause bubbling and a white precipitate of calcium fluoride (fluorite). To be sure the neutralizing reaction has been complete, keep adding marble or limestone chips till no more bubbling occurred. This may take a while.
8. Possibly cleaning and or removing quartz with Hydrofluoric Acid (HF)
I am not going to tell you how to use this terrible chemical, but I will tell you some things about it that I hope may persuade you not to try and use it. Ill also tell you about some of the things it can and cannot do. The danger involved in using this acid is so great that even the experts here on Mindat recommend that you don’t use it. Further there is an informal policy here on Mindat, that the experts will not tell people on the bulletin board how to use this acid. There are a few uses for it that can not be replaced with less dangerous chemicals and if you really need to use HF for those purposes, then you need to find someone who knows how to handle HF, an old chemist or chemistry teacher will do nicely and have them personally work with you and train you in how to use this reagent safely. To try and teach you about this acid by writing is not something I will willingly do. It would be inviting all kinds of trouble, especially in this litigious society.
Hydrofluoric acid is basically the poisonous gas hydrogen fluorite, dissolved in water. In its concentrated form it is a clear liquid that cannot be stored in glass because it will dissolve the container. I have been told, that in old chemistry labs it used to be store in bottles made of paraffin. In small quantities it now comes in bottles made of thick plastics like polypropylene. When you open the bottle the gas will start to escape and on a humid day you can see it. It will rise up a little like steam, and let me assure you that you really do not want to breathe the stuff. So if the day is not humid, and you do not have a fume hood to get rid of the fumes from the HF, you really can’t tell if you are going to breathe any of the stuff till it is too late. A bit probably won’t kill you, but if you get a whiff of it, you will run for cover. Even the most callous of us that have used this reagent many times treat this beast with respect. That is as far down that road as I am going to take you. Let me also say that many people, even those trained in chemistry have been injured short and long term by this chemical. It can do nasty things to your body. If in spite of what I have said here you persist in trying to use HF, for God sakes, at the very least, go to Wikipedia on the net and read about the acid and the attendant dangers.http://en.wikipedia.org/wiki/Hydrofluoric_acid
All that being said, if you want to remove quartz or other silica containing minerals from around gold, silver or other minerals that are not affected by HF, then there may be no other option. In a few cases, quartz crystals may be coated with a thin druse of secondary micro quartz crystals that can possibly be dislodged by using hydrofluoric acid. To dissolve, or partially dissolve the quartz from around gold, silver, etc you need to use fairly concentrated HF and then the process will be slow, a day or two or more, depending on how much you want to remove. Massive quartz (bull quartz), chalcedony and opal are attacked much more quickly than the surface of regular quartz crystals. To dissolve a well-formed quartz crystal with room temperature HF can take several days, and it does not polish the quartz and make it look shiny like it will regular glass, but rather jagged and dull. I have seen some rather drab Japan law twined quartz from Washington Camp, Arizona treated in fairly concentrated HF for several hours with the surprising result that the very fine drusy quartz that was giving a mat finish to the twins was mostly removed and the surfaces left shiny. We forgot about putting them in the acid and went back after about four hours to find this surprising result. I don’t think we would have had the nerve to leave them in that long if we had remembered sooner that they were in the HF. Some of the crystals had little cracks in them, and though the HF left the surface of the quartz crystals shiny, it did attack it a bit along the edges of the cracks and it left little white trails along the cracks. My advice is that unless the quartz you are trying to clean is really exceptional, don’t try and clean it with HF. It just is not worth the cost and the risk to your health. The last quote I got from a chemical company for a gallon of HF was something over $100 dollars.
Sodium Hydroxide
Alfredo Petrov has had success in cleaning coatings of scorodite from Japan law quartz twins from Kami, Bolivia. These were clusters of Japan law twins. He placed the quartz in a concentrated solution of sodium hydroxide. This turned the scorodite into goethite, which could then be removed with Waller solution, oxalic acid or Hydrochloric acid. You probably don't want to leave the quartz very long in a strong lie (sodium hydroxide)solution because quartz is slowly soluble in this reagent at room temperature. Strong solutions of sodium hydroxide are very corrosive and will basically dissolve your skin by turning the fat in your skin into soap. Wear plastic gloves when handling this material. You can neutralize lye solutions with vinegar or hydrochloric acid.
Hydrogen Peroxide
Sometimes you can use hydrogen peroxide to remove certain black manganese minerals like todorokite from quartz crystals. Some people have reported success in removing organic materials like lichen, clay minerals and other find grained minerals from quartz and other minerals with the use of hydrogen peroxide solutions. When the solution reacts with the manganese minerals it generated bubbles of oxygen gas. Reagent grade hydrogen peroxide can react violently with things like asphalt. Like using hydrofluoric acid, be sure you really know what you are doing when you work with concentrated hydrogen peroxide. We have had enough initial success in removing clay from Chinese Azurite using a standard week solution of hydrogen peroxide (hair bleach quality) that we are going to experiment more with this reagent. It is not clear just what effect hydrogen peroxide has in effecting its work in loosening impacted clay and other fine grained materials, but it does seem to have a salutatory effect. I have not had much experience using this reagent on quartz, so any help from those more knowledgeable than I will be welcomed. The results of using this reagent on manganese oxides can be very dramatic. You drop the specimen into the solution and when the bubbles clear away in a minute or two, the specimens is magically clean with all the black manganese oxide gone. I was once able in just a few minutes to clean many specimens of prehnite casts after laumontite that appeared to be hopelessly covered with black todorokite. It was like magic.
When working with chemicals like those above, you should not mix the different solutions together. They will sometimes produce unwelcome precipitates or react in ways that will be unwelcome or dangerous.
We would like to solicit Mindaters who have had experience with cleaning quartz of different kinds, to share their experience with various chemicals by emailing us so we can make this article more comprehensive and useful. If there is something you don’t understand or want explained further, post a note on the board below and you will almost certainly be able to get further help. I have been called an expert now and then but just when I start to feel a little smug, an old friend reminds me that an ex is a has been and a spurt is a drip under pressure.
Rock Currier


 YueGongAnBei 44051102000467
 |
|